MVVM Stack for WinJS


I've put a small demo of Model-View-ViewModel (MVVM) applied to WinJS applications on Codeplex: read about it here

author: Corrado Cavalli | posted @ lunedì 4 marzo 2013 11:16 | Feedback (0)

Two-Way databinding in WinJS


Read the post here

author: Corrado Cavalli | posted @ lunedì 5 novembre 2012 07:15 | Feedback (0)

WinJS Custom Controls


Controls are the basic blocks of any application, you use controls everywhere and also HTML Metro apps are part of the game, you add a control inside a HTML Metro page just placing a <div> with a special “data-win-control” attribute in it:
here’s an example:
<div data-win-control="WinJS.UI.SemanticZoom" >
</div>
if you have pages (even in different applications) that need some special kind of functionality paired with some custom UI, custom controls allows you to reach the “write once, use everywhere” paradigm (unless you like reinventing the wheel of course…)
Let’s see how you can create your own custom control and use it inside a HTML Metro application, simulating a simple custom countdown control.
Step1: Design the user interface
While not strictly a requirement I personally like to start from the appeareance of my control, so I fire up Expression Blend and start design it:
image image-1
I’ve highlighted the HTML representing my control’s UI and, on right side, associated CSS, 
question now is: how do we turn it in a WinJS custom control?
Step2: Define public interface
The countdown control will expose:
  •  initialValue property: will be initialized with countdown initial value
  •  start method: begins countdown
  • countdownexpired and coundownstarted events
Step3: The code sss
Below is the control’s code contained in a separate countdown.js file:
//Countdown control
(function (winJs) {
    var _events = ["countdownexpired", "coundownstarted"];

    WinJs.Namespace.define("MyApp.Controls", {
        Countdown: WinJs.Class.define(function (element, options) {
            if (!element) throw "element must be provided";
            options = options || {};
            this._element = element;
            this._element.winControl = this;
            this._buildVisualTree();
            winJs.UI.setOptions(this, options);
        },
            {
                //Private members
                _element: null,
                _cdn_host: null,
                _cdn_content: null,
                _timerId: 0,
                _progress: 0,
                _buildVisualTree: function () {
                    this._cdn_host = document.createElement("div");
                    this._cdn_host.className = "cdn-host";
                    this._cdn_content = document.createElement("span");
                    this._cdn_content.className = "cdn-content win-type-xx-large";
                    this._cdn_host.appendChild(this._cdn_content);
                    this._element.appendChild(this._cdn_host);
                },
                _onTick: function () {
                    this._progress--;
                    this._cdn_content.innerText = this._progress;
                    if (this._progress === 0) {
                        this.dispatchEvent("countdownexpired");
                        clearInterval(this._timerId);
                        this._timerId = 0;
                    }
                },

                //Public members
                element: {
                    get: function () { return this._element; }
                },
                initialValue: {
                    get: function () { return this._cdn_content.innerText; },
                    set: function (value) {
                        this._cdn_content.innerText = value;
                    }
                },

                //Play advertising
                start: function () {
                    if (this._timerId === 0) {
                        this._progress = this.initialValue;
                        this._timerId = setInterval(this._onTick.bind(this), 1000);
                        this.dispatchEvent("coundownstarted");
                    }
                }
            })
    });

    winJs.Class.mix(MyApp.Controls.Countdown, winJs.Utilities.eventMixin);
    winJs.Class.mix(MyApp.Controls.Countdown, winJs.Utilities.createEventProperties(_events));

}(WinJS))

Let’s dissect it:

A WinJS custom control is just a class that has a constructor accepting two parameters (if ‘class’ sounds weird to you see my previous post)
  • The element decorated with ‘data-win-control’ attribute (element)
  • An optional ‘options’ object containing control’s initialization parameters.

Our control will be contained inside a MyApp.Controls namespace.
Inside constructor I associate passed element with control's element property and I also add associate control’s instance with a conventionally named winControl property appended to passed element so that it can easily accessible from page’s javascript code.
The buildVisualTree function uses javascript to recreate control’s DOM and appends it to passed element while setOptions is a WinJS helper method that associates passed options to control so that it can be correctly initialized.
Since the control exposes events we finally use a couple of WinJS helper methods to ‘mix’ control’s class with a class defined inside WinJS framework to add all stuff required to handle and raise events (like onXYZ methods or addEventListener/removeEventListener support)
The rest of the code is just countdown code implementation, nothing really new here.
Step4: Using the control
To embed the code the control inside a HTML page we use exactly the same approach used for any WinJS control, add both required javasript and css references and decorate placeholder div with appropriate attributes, here’s the complete HTML page content:
<!DOCTYPE html>
<html>
<head>
    <meta charset="utf-8" />
    <title>DemoCustomControl</title>

    <!-- WinJS references -->
    <link href="//Microsoft.WinJS.1.0.RC/css/ui-dark.css" rel="stylesheet" />
    <script src="//Microsoft.WinJS.1.0.RC/js/base.js"></script>
    <script src="//Microsoft.WinJS.1.0.RC/js/ui.js"></script>

    <!-- DemoCustomControl references -->
    <link href="/css/default.css" rel="stylesheet" />
    <link href="/countdown.css" rel="stylesheet" type="text/css">
    <script type="text/javascript" src="js/controls/countdown.js"></script>
    <script src="/js/default.js"></script>

    <script>
        WinJS.UI.processAll();
        WinJS.Utilities.ready(function () {
            var countdown = document.getElementById("countdown1");
            countdown.winControl.addEventListener("countdownexpired", function () {
                var msg = document.getElementById("result");
                msg.textContent = "done!";
            }, false);

            document.getElementById("start").addEventListener("click", function () {
                countdown.winControl.start();
            }, false);

        }, true).done();
    </script>

</head>
    <body>
        <div id="countdown1" data-win-control="MyApp.Controls.Countdown" data-win-options="{initialValue:4}">
        </div>
        <button id="start">Start</button>
        <div id="result"></div>
    </body>
</html>
A couple of notes:
  • we invoke WinJS.UI.processAll() method to force ‘transformation’ of ‘countdown1’ div into countdown control.
  • we use WinJS.Utilities.ready() function to be sure that DOM tree is available when code runs (something that JQuery users know quite well).
  • note how countdown control is initialized using data-win-options attribute to 4 seconds.
Pressing start you will now see countdown starting and a message appearing at the end:
image
I found little documentation about creating custom control, that’s the reason of this post, if you want to know more I recommend this Build session: http://channel9.msdn.com/Events/BUILD/BUILD2011/APP-846T
Technorati Tags: ,

author: Corrado Cavalli | posted @ sabato 21 luglio 2012 13:00 | Feedback (0)

Using C# code inside a Metro HTML application


Let’s say you’re working on a HTML Metro app and you’d like to reuse some C# code instead of rewriting, the good new is that you can, here’s how:

Create a blank new WinJS application and add a div inside default.html page:

<body>
    <div id="output"></div>
</body>

Now add a new C# library to WinJS solution:

image

Change the output type of the library project to WinMD file

image 

let’s add a couple of classes to C# library, we’re going to consume them from our HTML application:

public sealed class Person 
{
      public Person(string name)
       {
          this.Name = name;
          this.Address = new Address() { City = "Milano", Code = 20100 };
       }

       public Address Address { get; private set; }

       public int Age { get; set; }

       public string Name { get; private set; }

       public int CalcSum(int a, int b)
       {
          return a + b;
       }
 }

public sealed class Address
{
      public string City { get; set; }

      public int Code { get; set; }
}

note how both Person and Address are marked as sealed, this is a mandatory requisite if you want expose them to others WinRT languages.
Let’s now add a reference from HTML application to our C# library:

image

and create an instance of Person class using Javascript:

app.onactivated = function (eventObject) {
        if (eventObject.detail.kind === Windows.ApplicationModel.Activation.ActivationKind.launch) {
            if (eventObject.detail.previousExecutionState !== Windows.ApplicationModel.Activation.ApplicationExecutionState.terminated) {
                // TODO: This application has been newly launched. Initialize 
                // your application here.
            } else {
                // TODO: This application has been reactivated from suspension. 
                // Restore application state here.
            }
            WinJS.UI.processAll();

            //This uses C# objects
            var person = new MyLib.Person("corrado");
            person.age = 12;
            var res = person.calcSum(3, 5);            
            output.innerText = "out is:" + person.name + "-" + person.age + "-" + res + "-" + person.address.city;
        }

and here’s simulator output:

image

I know it might sound strange to mix Javascript with C# when you can do exactly same things with both languages on Metro but when you have some complex logic
or you want to hide some code as much as possible (you can do exactly the same with C++ code) this may be a viable alternative.

Technorati Tags: ,

author: Corrado Cavalli | posted @ venerdì 27 aprile 2012 10:07 | Feedback (0)

Test Azure configuration change using local development environment


Azure applications, may have a set of parameters associated, this allows you to change your app configuration without having to redeploy the entire package (a long operation in any case).
You can control how an application reacts to a parameter modification by subscribing RoleEnvironment.Changing event, if you want to restart the whole role when a parameter change you can simply set Cancel=true inside Changing event:

RoleEnvironment.Changing += (s, e) =>
{
e.Cancel = true;
};

in this case, when application’s .cscfg file content change, the role is shut down then restarted so that new parameters can be properly reloaded. If you don’t want to restart the role but handle modifications yourself you can handle Changes parameter passed to RoleEnvironment.Changing event.

How can you test this logic when your app runs inside Azure local compute emulator? here are basic step:

  • Run you app locally and read what is current development id by opening compute emulator UI and reading what between parenthesis (2103 in following example) following deploymentXX label:

    image
  • Run Windows Azure Command Prompt and navigate to the folder that contains your configuration file ServiceConfiguration.cscfg and run this command:

    csrun /update:[id];ServiceConfiguration.cscfg

    image


And you’ll see your role reacting to configuration change appropriately.

Technorati Tags:

author: Corrado Cavalli | posted @ venerdì 20 aprile 2012 16:28 | Feedback (1)

Copying and moving styles using Expression Blend for HTML


Here’s a couple of Blend tricks I’d like to share:

Let’s say you have this HTML fragment:

<body>
    <H1>Content goes here</H1>
</body>

by looking at Blend’s css properties pane you can see that, it has some css rules automatically applied:

image

you can copy the applied rule and paste it into another stylesheet by right clicking the highlighted row into selecting copy:

image 

Now go to the Styles pane and click the “+” button shown in the picture below to add a new stylesheet:

image

then right click new file and select paste from context menu to paste the selector.

image

If you already have the same selector inside target file the properties will be merged (you’ll see Paste properties instead of Paste menu) of course you can also right click the selector inside source file and copy/paste from there but in this case you will copy all selectors not just applied one.

Let’s now suppose you change h1’s background color:

image

this results in this inline style:

<body>
    <H1 style="background-color: #43A626;">Content goes here</H1>
</body>

how do I move the inline style to h1’s selector inside my test.css? select Inline Style on Blend’s pane and select Copy from context menu:

image

then select target stylesheet, target rule (if any), right click and then Paste properties from context menu:

image

to have properties added to selected file or rule.

Technorati Tags:

author: Corrado Cavalli | posted @ lunedì 16 aprile 2012 08:57 | Feedback (0)

Fragment loading and Navigation in HTML5 Metro applications


Navigation is one of the core concepts of any Metro application, in this post I’ll show how can you implement it in a HTML based Metro application.

The easiest way is to use the same common approach used by millions of HTML pages: using an hyperlink.
Assuming you are in default.html page and wish to navigate to page2.html all you need to do is add something like:
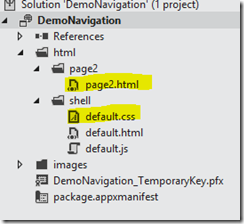
image_thumb

   1:  <!DOCTYPE html>
   2:  <html>
   3:  <head>
   4:      <meta charset="utf-8">
   5:      <title>DemoNavigation</title>
   6:   
   7:      <!-- WinJS references -->
   8:      <link href="//Microsoft.WinJS.0.6/css/ui-dark.css" rel="stylesheet">
   9:      <script src="//Microsoft.WinJS.0.6/js/base.js"></script>
  10:      <script src="//Microsoft.WinJS.0.6/js/ui.js"></script>
  11:   
  12:      <!-- DemoNavigation references -->
  13:      <link href="default.css" rel="stylesheet">
  14:      <script src="default.js"></script>
  15:  </head>
  16:  <body>
  17:      <a href="../page2/page2.html">Click here to navigate to Page 2</a>
  18:  </body>
  19:  </html>

default.html

When you run the app and click the hyperlink you move straight to page2.html.
This is approach is quite common, works fine (of course) but has a main drawback: you loose state when you move from default.html to page2.html, so if you need to maintain state, something that’s quite common in client application Smile, you’re on your own.

The problem is the same in web application that’s why technologies like ajax or single page applications are gaining more and more momentum.

Let’s now briefly see how you can embed an HTML fragment into default.html using WinJS’s HtmlControl, here’s the html you need to add to default.html page:
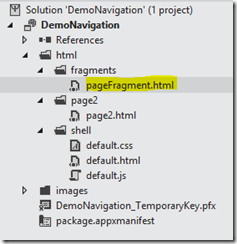
image_thumb1
   1:  <!--pageFragment.html-->
   2:  <div style="color: #b6ff00 ">
   3:      <p id="txt" class="win-type-x-large win-type-ellipsis">This is a html fragment</p>
   4:  </div>
 
   1:  <body>
   2:      <h1 class="win-title">This is main page</h1>
   3:      <div data-win-control="WinJS.UI.HtmlControl" 
   4:           data-win-options="{uri:'../fragments/pageFragment.html'}">
   5:      </div>
   6

Launching the app you’ll see exactly what expected but with some limitations:

image_thumb4

the fragment can’t reference any css nor javascript file, and you are not informed when the fragment is loaded, luckily there’s a way to get some javascript code executed when fragment is loaded into the DOM: WinJS.Pages.define.

Let’s assume we wish to dynamically change the text of the fragment after it has been loaded so let’s add a new pagedefine.js file (just for better understanding and separation) to our solution:
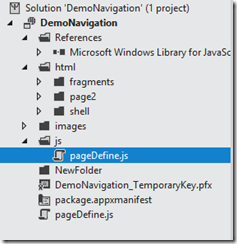
image_thumb5

   1:  /// <reference path="//Microsoft.WinJS.0.6//js/base.js" />
   2:   
   3:  (function () {
   4:      'use strict';
   5:   
   6:      WinJS.UI.Pages.define("../fragments/pageFragment.html",
   7:          {
   8:              ready:function(element,options)
   9:              {
  10:                  var text = document.getElementById("txt");
  11:                  text.innerText = new Date().toLocaleString();
  12:              }        
  13:          });
  14:   
  15:   
  16:  }());

   1:  <!-- WinJS references in default.html -->
   2:      <link href="//Microsoft.WinJS.0.6/css/ui-dark.css" rel="stylesheet">
   3:      <script src="//Microsoft.WinJS.0.6/js/base.js"></script>
   4:      <script src="//Microsoft.WinJS.0.6/js/ui.js"></script>
   5:      <script type="text/javascript" src="../../js/pageDefine.js"></script>

The define method available on Pages object accept the uri that uniquely identifies the page that is going to be loaded and an object exposing a set of properties, among these, ready is the function that will be called when page has been loaded into DOM, then the code just changes element content with current date:

image_thumb8

we’re now in a state where we can load a HTML fragment and run some code after it has been loades, before going further I need to point out that HmlControl can only load local html, if you need to load external content iFrame is your friend.

Problem now is: what if I need to load the fragment programmatically? (e.g. on a button click), let’s remove HtmlControl from default.html and let’s inject the fragment with a little help from WinJS:

   1:  <!DOCTYPE html>
   2:  <html>
   3:  <head>
   4:      <meta charset="utf-8">
   5:      <title>DemoNavigation</title>
   6:   
   7:      <!-- WinJS references in default.html -->
   8:      <link href="//Microsoft.WinJS.0.6/css/ui-dark.css" rel="stylesheet">
   9:      <script src="//Microsoft.WinJS.0.6/js/base.js"></script>
  10:      <script src="//Microsoft.WinJS.0.6/js/ui.js"></script>
  11:      <script type="text/javascript" src="../../js/pageDefine.js"></script>
  12:   
  13:      <!-- DemoNavigation references -->
  14:      <link href="default.css" rel="stylesheet">
  15:      <script src="default.js"></script>
  16:  </head>
  17:  <body>
  18:      <h1 class="win-title">This is main page</h1>
  19:      <button id="btnLoad">Load fragment</button>
  20:      <div id="contentHost"></div>
  21:  </body>
  22:  </html>
   1:  //default.js
   2:  (function () {
   3:      "use strict";
   4:      var app = WinJS.Application;
   5:      app.onactivated = function (eventObject) {
   6:          if (eventObject.detail.kind === Windows.ApplicationModel.Activation.ActivationKind.launch) {
   7:              if (eventObject.detail.previousExecutionState !== Windows.ApplicationModel.Activation.ApplicationExecutionState.terminated) {
   8:                  // TODO: This application has been newly launched. Initialize 
   9:                  // your application here.
  10:              } else {
  11:                  // TODO: This application has been reactivated from suspension. 
  12:                  // Restore application state here.
  13:              }
  14:              WinJS.UI.processAll().then(function (e) {
  15:                  WinJS.Utilities.id("btnLoad").listen("click", function (e) {
  16:                      //Load fragment
  17:                      var host=WinJS.Utilities.id("contentHost")[0];
  18:                      WinJS.UI.Pages.render("../fragments/pageFragment.html", host, { data: 'data2share' });
  19:                  });
  20:   
  21:              }).done();
  22:          
  23:          }
  24:      };    
  25:   
  26:      app.start();
  27:  })();

In default.html I added a button and a “contentHost” div whose role is to be the container for for dynamically loaded content, default.js subscribes button’s click event (using WinJS.Utilities methods) and invokes WinJS.Pages.render method.
WinJS.Pages.render method accepts the uri of the fragment to load, the host element where fragment will be appended and optional data to pass to loaded fragment.
Here’s how I changed fragment’s code to handle passed parameter:

   1:  /// <reference path="//Microsoft.WinJS.0.6//js/base.js" />
   2:   
   3:  (function () {
   4:      'use strict';
   5:      WinJS.UI.Pages.define("../fragments/pageFragment.html",
   6:          {
   7:              ready:function(element,options)
   8:              {
   9:                  var text = document.getElementById("txt");
  10:                  text.innerText = options.data;
  11:              }        
  12:          });
  13:  }());

result, after clicking “Load fragment” button, is:

image_thumb10

We now know how to dynamically load content into live DOM.

About page navigation: the best way to include it in a Html5 Metro app is to start with the Navigation Application template that creates all the infrastructure required to support navigating between pages while maintaining state, here’s what get’s created once you select the template:
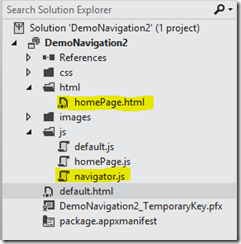

image_thumb11

 
   1:  <!--default.html-->
   2:  <!DOCTYPE html>
   3:  <html>
   4:  <head>
   5:      <meta charset="utf-8">
   6:      <title>DemoNavigation2</title>
   7:      <!-- WinJS references -->
   8:      <link href="//Microsoft.WinJS.0.6/css/ui-dark.css" rel="stylesheet">
   9:      <script src="//Microsoft.WinJS.0.6/js/base.js"></script>
  10:      <script src="//Microsoft.WinJS.0.6/js/ui.js"></script>
  11:   
  12:      <!-- DemoNavigation2 references -->
  13:      <link href="/css/default.css" rel="stylesheet">
  14:      <script src="/js/default.js"></script>
  15:      <script src="/js/navigator.js"></script>
  16:  </head>
  17:  <body>
  18:      <div id="contenthost" 
  19:          data-win-control="DemoNavigation2.PageControlNavigator" 
  20:          data-win-options="{home: '/html/homePage.html'}">
  21:      </div>    
  22:  </body>
  23:  </html>

As you can see homePage.html (the starting page) contains a PageControlNavigator control that is defined inside navigator.js that basically uses WinJS.Pages.render to append other pages to contenthost div and adds typical navigation features like backstack etc… the control is configured via data-win-options to display homePage.html as initial content.
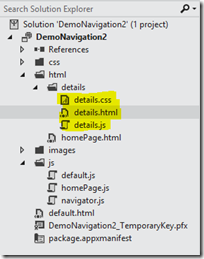
To add a page that can be navigated, let’s add a new folder named details and inside it a new Page control named details.html (see below):
image_thumb14

   1:  //detail.js
   2:  (function () {
   3:      "use strict";
   4:   
   5:      // This function is called whenever a user navigates to this page. It
   6:      // populates the page elements with the app's data.
   7:      function ready(element, options) {
   8:          // TODO: Initialize the fragment here.
   9:      }
  10:   
  11:      function updateLayout(element, viewState) {
  12:          // TODO: Respond to changes in viewState.
  13:      }
  14:   
  15:      WinJS.UI.Pages.define("/html/details/details.html", {
  16:          ready: ready,
  17:          updateLayout: updateLayout
  18:      });
  19:  })();

Adding a new page control results in three files: the html, the css and the javascript code behind that, as you see below, it includes the necessary define invocation so that, inside ready handler, we can run page’s initialization code.
The only thing missing is triggering navigation from homePage.html to details.html, let’s assume this would happen, again, via a button:

   1:  <!--homePage.html-->
   2:  <!DOCTYPE html>
   3:  <html>
   4:  <head>
   5:      <meta charset="utf-8">
   6:      <title>homePage</title>
   7:      
   8:      <!-- WinJS references -->
   9:      <link href="//Microsoft.WinJS.0.6/css/ui-dark.css" rel="stylesheet">
  10:      <script src="//Microsoft.WinJS.0.6/js/base.js"></script>
  11:      <script src="//Microsoft.WinJS.0.6/js/ui.js"></script>
  12:      
  13:      <link href="/css/default.css" rel="stylesheet">
  14:      <link href="/css/homePage.css" rel="stylesheet">
  15:      <script src="/js/homePage.js"></script>
  16:  </head>
  17:  <body>
  18:      <!-- The content that will be loaded and displayed. -->
  19:      <div class="fragment homepage">
  20:          <header aria-label="Header content" role="banner">
  21:              <button class="win-backbutton" aria-label="Back" disabled></button>
  22:              <h1 class="titlearea win-type-ellipsis">
  23:                  <span class="pagetitle">Welcome to DemoNavigation2!</span>
  24:              </h1>
  25:          </header>
  26:          <section aria-label="Main content" role="main">
  27:              <button id="btnLoad">Details</button>
  28:          </section>
  29:      </div>
  30:  </body>
  31:  </html>

   1:  //homePage.js
   2:  (function () {
   3:      "use strict";
   4:      // This function is called whenever a user navigates to this page. It
   5:      // populates the page elements with the app's data.
   6:      function ready(element, options) {
   7:          document.getElementById("btnLoad").addEventListener("click", function (e) {
   8:              WinJS.Navigation.navigate("/html/details/details.html");
   9:      });
  10:      }
  11:   
  12:      WinJS.UI.Pages.define("/html/homePage.html", {
  13:          ready: ready
  14:      });
  15:  })();

as you see, application navigation is handled globally through WinJS.Navigation object that exposes methods like navigate (together with back, canGoBack, canGoForward…) that navigates (thus, loads page into default.html’s DOM) to details.html, this way, since default.html isn’t discarded, state is preserved and experience is similar to any other client application development.

Quite cumbersome to understand at the beginning, but easy to implement thanks to Visual Studio 11 templates

Technorati Tags: ,

author: Corrado Cavalli | posted @ mercoledì 11 aprile 2012 00:38 | Feedback (0)

WinJS namespaces and classes


In Javascript is extremely easy to write spaghetti code, when you write something like:

var foo = 12;
function log(value)
{
console.log(value);
}

both foo variable and log function become part of the global namespace, you can imagine what could happen when you add a new Javascript file that also includes a foo function.

In .NET to better organize the code we have Namespaces that can be used to group types together and prevent naming collision, while Javascript misses this concept natively it can be simulated through objects and that’s what Microsoft did inside WinJS Library.
Here’s how we can expose a ‘Logger’ object inside ‘MyLibrary’ namespace defined inside myLibrary.js file.

(function ()
{
//Define the namespace
var myLib = WinJS.Namespace.define("MyLibrary");

//Adds a logger object to the namespace
myLib.Logger = {
log: function (text) {
console.log(text);
}
}
})();
 
note that to also definition is self contained inside a self invoking function (very common patter in Javascript)
 
Using the Logger object is even simpler:
 
//Log
var logger = MyLibrary.Logger;
logger.log("log this");

//Or simply...
MyLibrary.Logger.log("loggin again");

namespaces can be aggregated so if you add a new file myUltraLibrary.js containing:

(function () {
var myLib = WinJS.Namespace.define("MyLibrary");

myLib.UltraLogger = {
log: function (text) {
console.log("ultra: " + text);
}
}
})();

you can now use the newly added UltraLogger object:
 
MyLibrary.Logger.log("loggin again");
MyLibrary.UltraLogger.log("Ultra logging");
 
Nice, but now I’m using sort of static classes exposed from a namespace, what if I want something like real .NET classes?
You’re probably aware that using some patterns you can simulate classes in in a classless language like Javascript but ,again, thanks WinJS we can quickly have classes in Javascript too, here’s how:
 
(function () {
var myLib = WinJS.Namespace.define("MyLibrary");

var multiLogger=WinJS.Class.define(function (loggerId) {
this._loggerId = loggerId;
this._textToLog = null;
},
{
tag: "multiLogger",
id: {
get: function () { return this._loggerId },
},
text: {
get: function () { return this.textToLog },
set: function (value) { this.textToLog = value; }
},
log: function () { console.log(this.textToLog) }
},
{
fastLog: function (text) { console.log(text) }
});

myLib.MultiLogger = multiLogger;

})();

the code add a new class MultiLogger to MyLibrary namespace using WinJS.Class.define method that accepts 3 parameters: a function representing class constructor (or null for an empty one) an object exposing instance properties (note that EcmaScript 5 allows definition of both get and set function associated to a property) and an optional object exposing static methods.
 
How can we use the MultiLogger class? exactly as if it was a .NET class:
 
//MultiLogger1
var multiLogger1 = new MyLibrary.MultiLogger(42);
// multiLogger1.id = 22; //We can't since id is read onlt...
var id = multiLogger1.id; //returns 42
multiLogger1.text = "Text to log";
multiLogger1.log();

//MultiLogger2
var multiLogger2 = new MyLibrary.MultiLogger(43);
multiLogger2.text = "more text...";
multiLogger2.log();

very nice isn’t it? :-)

author: Corrado Cavalli | posted @ mercoledì 21 marzo 2012 14:55 | Feedback (3)

Available memory and Background agents in Windows Phone 7


When you create a background agent for Windows Phone 7 there are a couple of important details you must be aware of:

  1. The total scheduled time for the agent to execute is 25 seconds, if you exceed it the agent will be killed by the scheduler.
  2. The max amount of memory available is 6 MB, if the agent allocates more the agent will be, again, killed.
  3. With Visual Studio debugger attached these limits are disabled.

An agent is killed silently and after two killing operations the scheduler will automatically disable it and your user probably will start wondering why your wonderful tile doesn’t work as expected.

The common problem I face when dealing with agents is that 6 MB of memory are a very strict constraint especially when you realize that the agent alone consumes more than 3 MB (in real cases I got more than 5 MB allocated at startup)
So what can you do do live in a such restrict space? along with optimizations (in some cases I ended up duplicating code in order to avoid to load some dependencies) my suggestion is: never trust the debugger, with it attached the allocated memory increases so you might end up with wrong measurements.
What I normally do is to write inside application tile what is the real amount of occupied memory so that I can quickly estimate how long I can go.

Code is really straightforward:

public class ScheduledAgent : ScheduledTaskAgent
{
protected override void OnInvoke(ScheduledTask task)
{
ShellTile tile = ShellTile.ActiveTiles.FirstOrDefault();
if (tile != null)
{
var current = DeviceStatus.ApplicationCurrentMemoryUsage;

ShellTileData data = new StandardTileData
{
Title = "Occ:" + current.ToString(CultureInfo.InvariantCulture),
};

tile.Update(data);
}

NotifyComplete();
}
}
 
And here are the differences between debug and standalone mode:
 
image debugger attached
imageStandalone
 
Compared to overall 6MB, an important difference…

author: Corrado Cavalli | posted @ giovedì 15 marzo 2012 20:24 | Feedback (1)

Win+X is your friend in Windows 8


As advanced user I often need to reach areas like Control Panel, Event Viewer or the good old friend Command Prompt and you might imagine how happy I was to discover that using Win+X you have access to a “developer menu” in lower left corner that give you access to OS’ hardcore areas Smile

image

You can also show the menu by pointing the mouse in lower left corner, wait for Start menu to appear then right clicking on it (but Win+X is a lot more faster…)

BTW: I took the shot using Win+PrintScreen that now automatically saves the screenshot under User’s MyPicture

Technorati Tags:

author: Corrado Cavalli | posted @ martedì 6 marzo 2012 11:15 | Feedback (8)