When you need to use a library in your C++ application you should tell the following things to the compiler:
- The name of the lib file
- The folder where to find the lib file
- The folder where to find the header file
In this post, I show how you can do this using Microsoft Visual Studio 2010. All the options are available as Properties of your current project.
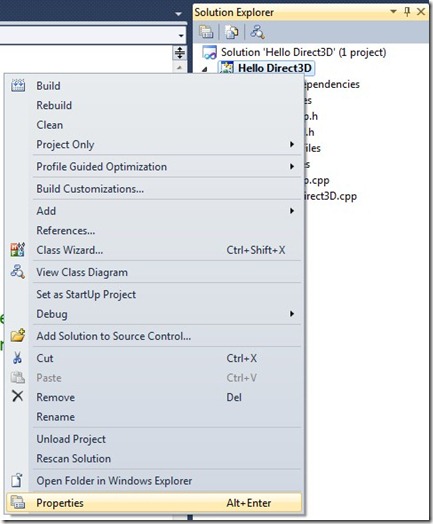
Right click the project name under the Solution Explorer and select Properties from the dropdown menu:

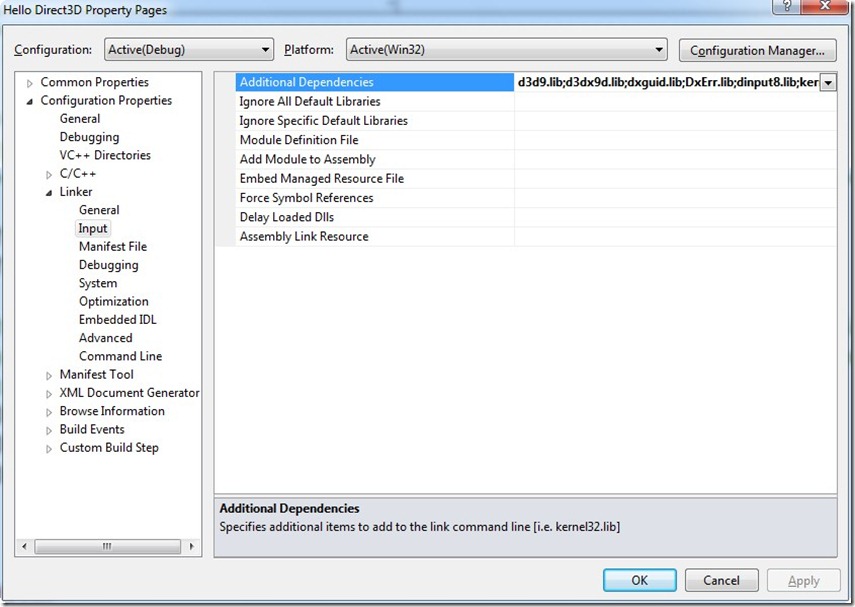
You can add all the names of your libraries in the “Configuration Properties –> Linker –> Input“ section:

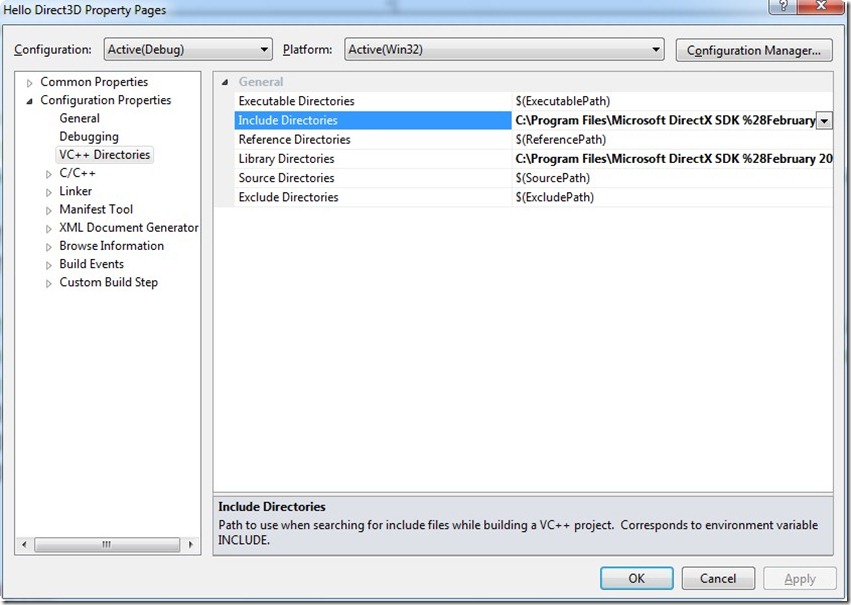
At the end, you can set the lib folders (“Library Directories”) and the headers folders (“Include Directories”) in the “Configuration Properties –> VC++ Directories” section.

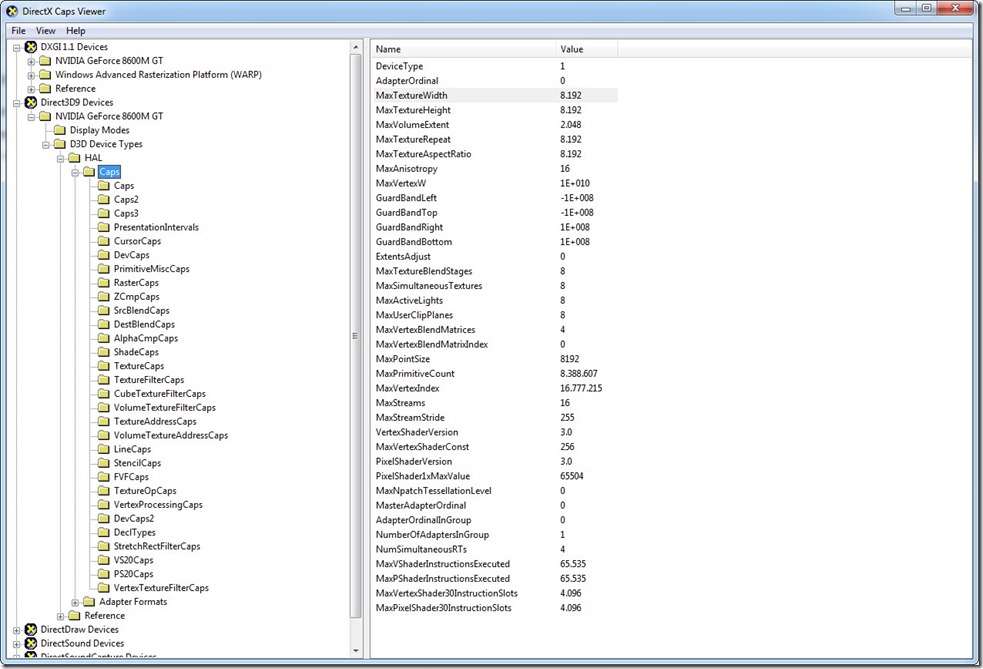
If you want to know the capabilities available in your graphics card you can use a tool in the DirectX SDK\Utilities\Bin\x86.
This tool is called “DXCapsViewer.exe”.
Here a screenshot with the capabilities of my NVIDIA GeForce 8600M GT:

You can download the latest DirectX SDK at the following link:
http://msdn.microsoft.com/en-us/directx/aa937788.aspx
Multisampling is an antialiasing technique directly supported by DirectX and obviously by XNA. The problem of aliasing occurs when you draw a line on a monitor with low resolution. In that cases you see a stair step when approximating a line by a matrix of pixels. Multisampling use neighbouring pixels (called samples) to calculate the final color of a pixel.
You can enable multisampling in XNA in this simple way:
graphics.PreferMultiSampling = true;
Then you should also specify two options.
The type is an enumerator (MultiSampleType) that represent the number of samples to use in multisampling. The quality is an integer that represent the quality level. This value is always set to zero. Before to set the type of multisampling you should always check if the graphic adapter support it using the method adapter.CheckDeviceMultiSampleType()
graphics.PreparingDeviceSettings += new EventHandler<PreparingDeviceSettingsEventArgs>((sender, e) =>
{
    PresentationParameters parameters = e.GraphicsDeviceInformation.PresentationParameters;
    parameters.MultiSampleQuality = 0;

    #if XBOX
        pp.MultiSampleType = MultiSampleType.FourSamples;
        return;
    #else

    int quality;
    GraphicsAdapter adapter = e.GraphicsDeviceInformation.Adapter;
    SurfaceFormat format = adapter.CurrentDisplayMode.Format;

    if (adapter.CheckDeviceMultiSampleType(DeviceType.Hardware, format, false, MultiSampleType.FourSamples, out quality))
    {
        parameters.MultiSampleType = MultiSampleType.FourSamples;
    }
    else if (adapter.CheckDeviceMultiSampleType(DeviceType.Hardware, format, false, MultiSampleType.TwoSamples, out quality))
    {
        parameters.MultiSampleType = MultiSampleType.TwoSamples;
    }
});
For more information:
http://en.wikipedia.org/wiki/Multisample_anti-aliasing
http://msdn.microsoft.com/en-us/library/bb975403.aspx
I would like to inform you that an interesting stable project is available on codeplex. This is the Nuclex Framework.
This is the main page of the project:
http://nuclexframework.codeplex.com/
The more interesting features for me are the following:
Mathematics plays a fundamental role in video game development. I strongly recommend to study the basics of linear algebra to have a better control of what you create. However, in XNA there is a lot of support for analytical geometry. There are some complex algorithms already implemented so it’s extremely important to know what it is available.
You can manage positions, speeds and directions using the classes: Point, Vector2, Vector3 and Vector4.
Vector3 a = new Vector3(0, 0, 10);
a.Normalize();
float x = a.X;
float y = a.Y;
float z = a.Z;
float length = a.Length();
Vector3 b = Vector3.Right;
Vector3 c = a + b;
float distance = Vector3.Distance(a, b);
float dotProduct = Vector3.Dot(a, b);
Vector3 crossProduct = Vector3.Cross(a, b);
Vector3 trasform = Vector3.Transform(a, Matrix.CreateScale(5));
The most important class in XNA is the Matrix class:
Matrix identity = Matrix.Identity;

Vector3 cameraPosition = new Vector3(0, 0, 10);
Vector3 cameraTarget = Vector3.Zero;
Vector3 cameraUp = Vector3.Forward;
var viewMatrix = Matrix.CreateLookAt(cameraPosition, cameraTarget, cameraUp);

Matrix projectionMatrix = Matrix.CreatePerspectiveFieldOfView(
    MathHelper.PiOver4,
    GraphicsDevice.Viewport.Width / GraphicsDevice.Viewport.Height,
    1, 100);

Matrix viewProjectionMatrix = viewMatrix * projectionMatrix;

var scale = Matrix.CreateScale(5);
var translation = Matrix.CreateTranslation(10, 20, 30);
var rotationX = Matrix.CreateRotationX(MathHelper.PiOver4);
var rotationY = Matrix.CreateRotationY(MathHelper.PiOver4);
var rotationZ = Matrix.CreateRotationZ(MathHelper.PiOver4);
var rotation = Matrix.CreateFromAxisAngle(new Vector3(1, 2, 3), MathHelper.PiOver4);
The Ray class represent a straight line. The Plane class represent a plane in the 3d world. Then there other important classes like Rectangle, BoundingBox, BoundingFrustum and BoundingSphere.
Rectangle rectangle1 = new Rectangle(0, 0, 10, 10);
Rectangle rectangle2 = new Rectangle(5, 5, 10, 10);
bool intersect = rectangle1.Intersects(rectangle2);
bool contains = rectangle1.Contains(new Point(10, 20));

Ray ray = new Ray(Vector3.Zero, Vector3.Forward);
Plane plane = new Plane(Vector3.Up, 10);
BoundingSphere sphere = new BoundingSphere(Vector3.One, 5);
BoundingBox box = new BoundingBox(Vector3.Zero, Vector3.One);

float? distance = ray.Intersects(plane);
PlaneIntersectionType pit = plane.Intersects(sphere);
ContainmentType ct = box.Contains(sphere);

BoundingFrustum frustum = new BoundingFrustum(ViewMatrix * ProjectionMatrix);
Vector3[] corners = frustum.GetCorners();
Plane nearPlane = frustum.Near;
Plane farPlane = frustum.Far;
With the class Curve is then possible to handle curves.
Finally, it is important to remember the class MathHelper that contains some useful methods
float max = MathHelper.Max(5, 10);
float min = MathHelper.Min(5, 10);
float piOver2 = MathHelper.PiOver2;
float degrees = MathHelper.ToDegrees(piOver2);
float radians = MathHelper.ToRadians(90);